

本文介绍了 `spring-ai-community/mcp-security` 项目,旨在解决 Spring AI 生态系统中模型上下文协议 (MCP) 的安全问题。本文提供了一份关于保护 MCP 服务器的全面指南,主要侧重于 OAuth2 和 API 密钥这两种身份验证机制。对于 OAuth2,本文详细介绍了必要的 Spring Boot 依赖、`application.properties` 配置属性和一个自定义安全配置类 `McpServerSecurityConfiguration`,以强制执行基于令牌的身份验证,并支持动态发现受信任的授权服务器。此外,本文还介绍了如何构建与 MCP 兼容的 Spring 授权服务器,并利用 `mcp-authorization-server` 依赖来支持 OAuth 2 动态客户端注册和资源指示器等功能。考虑到并非所有环境都支持 OAuth2 基础设施,本文还介绍了一种替代的基于 API 密钥的安全解决方案,包括所需的依赖、用于表示已验证实体的 `ApiKeyEntity`,以及通过 `McpApiKeyConfigurer` 管理 API 密钥的安全配置。本指南旨在帮助 Spring 开发者灵活地保护 MCP 服务器,使其兼容各种 AI 工具和环境。
Model Context Protocol, or MCP for short, has taken over the AI world. If you've been following our blog, you've probably read the introduction to the topic, Connect Your AI to Everything: Spring AI's MCP Boot Starters. The security aspects of MCP have been evolving fast, and the latest version of the spec is getting more and more support from the ecosystem. To meet the needs of Spring users, we have incubated a dedicated project on Github: spring-ai-community/mcp-security. This week, we pushed our first releases, and you can now add them to your Spring AI 1.1.x-based applications. In this post, we'll explore:
- Securing MCP Servers with OAuth2
- Building an MCP-compatible Spring Authorization Server
- Securing MCP Servers with API Keys instead of OAuth2
According to the Authorization section of the MCP specification, MCP Servers exposed over HTTP must be secured with OAuth 2 access tokens. Any call to an MCP Server must have a header Authorization: Bearer <access_token>, where the access token is obtained from an authorization server (think: Okta, Github, ...) on behalf of the user. The MCP Server must also explicitly advertise the authorization servers it trusts, so MCP clients can discover them dynamically, register themselves with the auth servers, and obtain tokens. We'll discuss authorization servers later on, but for now we'll assume you have an auth server configured and running at <AUTH_SERVER_URL>, and we'll hook our MCP Server to it. If you need to setup an authorization server, see next section.
First, add the required dependencies to your project:
Maven:
<dependencies>

    <!-- Spring AI MCP starter -->
    <dependency>
        <groupId>org.springframework.ai</groupId>
        <artifactId>spring-ai-starter-mcp-server-webmvc</artifactId>
    </dependency>
    <!-- MCP Security -->
    <dependency>
        <groupId>org.springaicommunity</groupId>
        <artifactId>mcp-server-security</artifactId>
        <version>0.0.2</version>
    </dependency>
    <!-- MCP Security dependencies -->
    <dependency>
        <groupId>org.springframework.boot</groupId>
        <artifactId>spring-boot-starter-oauth2-resource-server</artifactId>
    </dependency>

</dependencies>
Gradle:
implementation("org.springframework.ai:spring-ai-starter-mcp-server-webmvc")
implementation("org.springaicommunity:mcp-server-security:0.0.2")
implementation("org.springframework.boot:spring-boot-starter-oauth2-resource-server")
Ensure that MCP server is enabled in your application.properties, and inject your authorization server URL:
spring.ai.mcp.server.name=my-cool-mcp-server
# Supported protocols: STREAMABLE, STATELESS
spring.ai.mcp.server.protocol=STREAMABLE
# Choose any property name you'd like
# You MAY use the usual Spring well-known "spring.security.oauth2.resourceserver.jwt.issuer-uri".
authorization.server.url=<AUTH_SERVER_URL>
We will add a simple MCP tool that greets the user, based on an input language ("english", "french", ...) and on the user's name.
@Service
public class MyToolsService {

    @McpTool(name = "greeter", description = "A tool that greets you, in the selected language")
    public String greet(
            @ToolParam(description = "The language for the greeting (example: english, french, ...)") String language
    ) {
        if (!StringUtils.hasText(language)) {
            language = "";
        }
        var authentication = SecurityContextHolder.getContext().getAuthentication();
        var name = authentication.getName();
        return switch (language.toLowerCase()) {
            case "english" -> "Hello, %s!".formatted(name);
            case "french" -> "Salut %s!".formatted(name);
            default -> ("I don't understand language \"%s\". " +
                        "So I'm just going to say Hello %s!").formatted(language, name);
        };
    }

}
In this example, the tool will look up the name of the user from the SecurityContext, and create a personalised greeting. The name of the user will be the sub claim from the JWT access token used to authenticate the request:
And, last but not least, we add a configuration class for security, for example McpServerSecurityConfiguration:
@Configuration
@EnableWebSecurity
class McpServerConfiguration {

    @Value("${authorization.server.url}")
    private String authServerUrl;

    @Bean
    SecurityFilterChain securityFilterChain(HttpSecurity http) throws Exception {
        return http
                // Enforce authentication with token on EVERY request
                .authorizeHttpRequests(auth -> auth.anyRequest().authenticated())
                // Configure OAuth2 on the MCP server
                .with(
                        McpResourceServerConfigurer.mcpServerOAuth2(),
                        (mcpAuthorization) -> {
                            // REQUIRED: the authserver's issuer URI
                            mcpAuthorization.authorizationServer(this.authServerUrl);
                            // OPTIONAL: enforce the `aud` claim in the JWT token.
                            mcpAuthorization.validateAudienceClaim(true);
                        }
                )
                .build();
    }

}
Run the application with ./mvnw spring-boot:run or ./gradlew bootRun. It should start on port 8080. If you try to access the MCP server at http://localhost:8080/mcp, you will get an WWW-authenticate indicating the OAuth2 resource metadata URL:
curl -XPOST  -w '%{http_code}\n%header{www-authenticate}' http://localhost:8080/mcp
#
# Will print out:
#
# 401
# Bearer resource_metadata=http://localhost:8080/.well-known/oauth-protected-resource/mcp
The metadata URL itself will indicate to potential clients where the authorization server is located:
curl http://localhost:8080/.well-known/oauth-protected-resource/mcp
#
# Will print out:
#
# {
#   "resource": "http://localhost:8080/mcp",
#   "authorization_servers": [
#     "<AUTH_SERVER_URL>"
#   ],
#   "resource_name": "Spring MCP Resource Server",
#   "bearer_methods_supported": [
#     "header"
#   ]
# }
This is not very useful to a human, but it helps other programs find the authentication entry points for your MCP Server. Every AI-based app has their own unique way of adding an MCP server, but a good tool to debug your server is the MCP inspector. You can run it easily with:
npx @modelcontextprotocol/[email protected]
In the UI, you must set the URL of your server, and then click "Open Auth Settings":

In the auth settings, select the "Quick OAuth Flow".
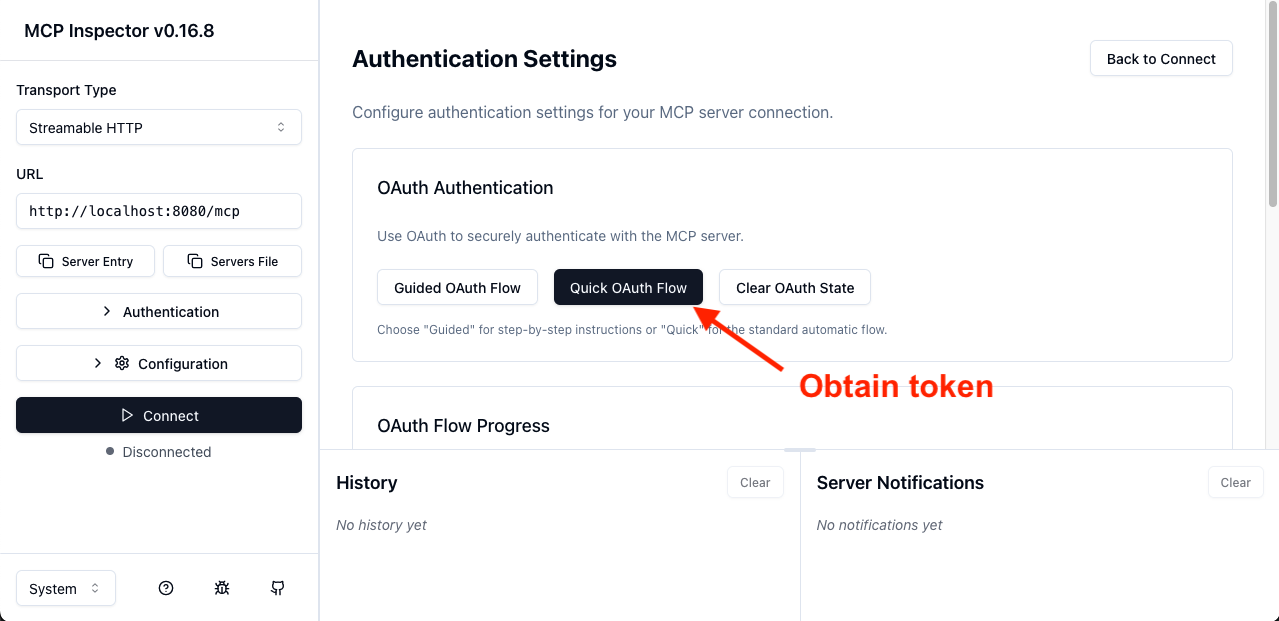
This will redirect you to the authorization server. Once you log in, you will be redirected back to the MCP inspector, which will display a success message and the first few characters of an access token. From there, you should be able to connect and ultimately call our "greeter" tool:
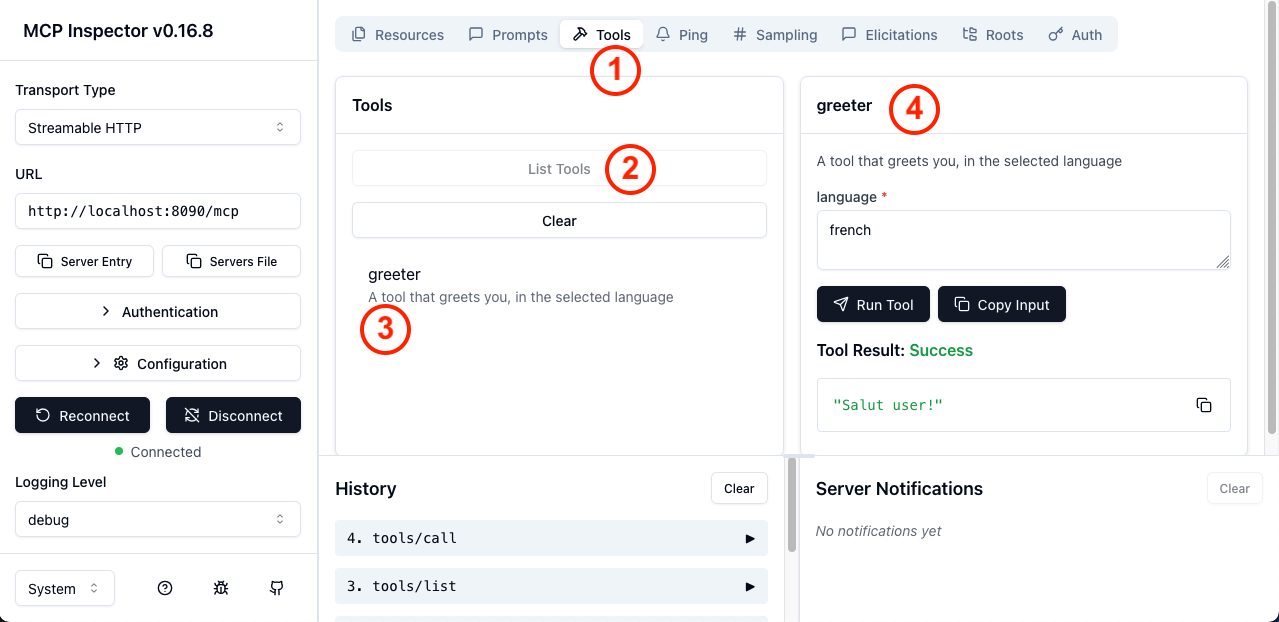
In the screenshot above, in order, you can do:
- Select the
Toolstab - Click
List tools - Select the
greetertool - Fill the arguments and call the tool
And with this, you have your very first spec-compliant, OAuth2-secured MCP Server. Of course, for users to log in, you must connect it to an authorization server, that complies with the required specifications for MCP, such as dynamic client registration. While there are many SaaS options available, you can also write you own with Spring Authorization Server.
MCP-compatible Spring Authorization Server
To create an MCP-compatible authorization server with Spring, create a new Spring project, with Spring Authorization Server, and add the MCP-specific:
Maven
<dependency>
    <groupId>org.springaicommunity</groupId>
    <artifactId>mcp-authorization-server</artifactId>
    <version>0.0.2</version>
</dependency>
Gradle
implementation("org.springaicommunity:mcp-authorization-server:0.0.2")
You can configure the Authorization Server in the usual way ( see reference documentation). Here is an example application.yml for registering a default client and a default user:
spring:
  application:
    name: sample-authorization-server
  security:
    oauth2:
      authorizationserver:
        client:
          default-client:
            token:
              access-token-time-to-live: 1h
            registration:
              client-id: "default-client"
              client-secret: "{noop}default-secret"
              client-authentication-methods:
                - "client_secret_basic"
                - "none"
              authorization-grant-types:
                - "authorization_code"
                - "client_credentials"
              redirect-uris:
                - "http://127.0.0.1:8080/authorize/oauth2/code/authserver"
                - "http://localhost:8080/authorize/oauth2/code/authserver"
                # mcp-inspector
                - "http://localhost:6274/oauth/callback"
    user:
      # A single user, named "user"
      name: user
      password: password

server:
  port: 9000
  servlet:
    session:
      cookie:
        # Override the default cookie name (JSESSIONID).
        # This allows running multiple Spring apps on localhost, and they'll each have their own cookie.
        # Otherwise, since the cookies do not take the port into account, they are confused.
        name: MCP_AUTHORIZATION_SERVER_SESSIONID
This is only an example, and you'll likely want to write your own configuration. With this configuration, there will be a single user registered (username: user, password: password). There will also be a single OAuth2 Client (default-client-id / default-client-secret). You can then activate all the authorization server capabilities with the usual Spring Security API, the security filter chain:
@Bean
SecurityFilterChain securityFilterChain(HttpSecurity http) throws Exception {
    return http
            // all requests must be authenticated
            .authorizeHttpRequests(auth -> auth.anyRequest().authenticated())
            // enable authorization server customizations
            .with(McpAuthorizationServerConfigurer.mcpAuthorizationServer(), withDefaults())
            // enable form-based login, for user "user"/"password"
            .formLogin(withDefaults())
            .build();
}
With this, your Spring Authorization Server will support OAuth 2 Dynamic Client Registration as well as Resource Indicators for OAuth 2. Connecting your MCP Server to this authorization server is compatible with the majority of AI tools, such as Claude Desktop, Cursor, or the MCP inspector.
Beyond OAuth 2: API keys
While the MCP specification mandates using OAuth2 for security, many environments do not have the infrastructure to support this use-case. To be usable in environments lacking OAuth 2, many clients, including the MCP inspector itself, allow you to pass custom headers when making requests. This opens the door to alternative authentication flows, including API key-based security. The MCP Security project supports API keys, which we'll showcase below.
First, add the dependencies to your project:
<dependencies>

    <!-- Spring AI MCP starter -->
    <dependency>
        <groupId>org.springframework.ai</groupId>
        <artifactId>spring-ai-starter-mcp-server-webmvc</artifactId>
    </dependency>
    <!-- MCP Security -->
    <dependency>
        <groupId>org.springaicommunity</groupId>
        <artifactId>mcp-server-security</artifactId>
        <version>0.0.2</version>
    </dependency>
    <!-- MCP Security dependencies -->
    <dependency>
        <groupId>org.springframework.boot</groupId>
        <artifactId>spring-boot-starter-security</artifactId>
    </dependency>

</dependencies>
Gradle:
implementation("org.springframework.ai:spring-ai-starter-mcp-server-webmvc")
implementation("org.springaicommunity:mcp-server-security:0.0.2")
implementation("org.springframework.boot:spring-boot-starter-security")
Ensure that MCP server is enabled in your application.properties:
spring.ai.mcp.server.name=my-cool-mcp-server
# Supported protocols: STREAMABLE, STATELESS
spring.ai.mcp.server.protocol=STREAMABLE
"Entites" authenticated by an API key, such as users or service accounts, are represented by ApiKeyEntity. The MCP server checks a specific header for an API key, loads the entity, and validates the secret. You can bring your own entity implementation, and your own entity repository, for specific security validations.
With that, you can configure the security for your project in the usual Spring-Security way:
@Configuration
@EnableWebSecurity
class McpServerConfiguration {

    @Bean
    SecurityFilterChain securityFilterChain(HttpSecurity http) throws Exception {
        return http.authorizeHttpRequests(authz -> authz.anyRequest().authenticated())
                .with(
                        McpApiKeyConfigurer.mcpServerApiKey(),
                        (apiKey) -> apiKey.apiKeyRepository(apiKeyRepository())
                )
                .build();
    }

    private ApiKeyEntityRepository<ApiKeyEntityImpl> apiKeyRepository() {
        var apiKey = ApiKeyEntityImpl.builder()
                .name("test api key")
                .id("api01")
                .secret("mycustomapikey")
                .build();

        return new InMemoryApiKeyEntityRepository<>(List.of(apiKey));
    }

}
Here we use an API Key repository that stores simple keys. Then you should be able to call your MCP server with a header X-API-key: api01.mycustomapikey. X-API-key is the default header name for passing API keys, followed by the header value {id}.{secret}. The secret is stored in bcrypt-hashed form on the server side. The mcpServerApiKey() configurer offers options for changing the header name, and even dedicated APIs to extract the API key from incoming HTTP requests.
Improving MCP security
If you would like to learn more, head over to the spring-ai-community/mcp-security project, for documentation and samples. You will also find support for client-side MCP security with Spring AI and Spring Security. Try it out with your own projects and applications, test it with the rest of the ecosystem, and help us improve it!
We are open to contributions, including feedback and issues.